Here's a Python program for an LDR-based street light controller using an Arduino UNO:
Showing posts with label Arduino UNO. Show all posts
Showing posts with label Arduino UNO. Show all posts
Smart irrigation system: Build a system that can automatically water plants based on weather conditions and soil moisture levels.
Here's an example Python program for a smart irrigation system based on Arduino UNO:
Garage door opener: Design a system that can open and close a garage door using a remote control.
Here's a sample Python code for controlling a garage door using an Arduino Uno and a remote control:
Obstacle Avoiding Robot
Here is a basic code for an obstacle avoiding robot using an Arduino board and Ultrasonic Sensors:
Voice Controlled Home Automation:
Here is a basic code for a voice-controlled home automation system using an Arduino board and a Voice Recognition module:
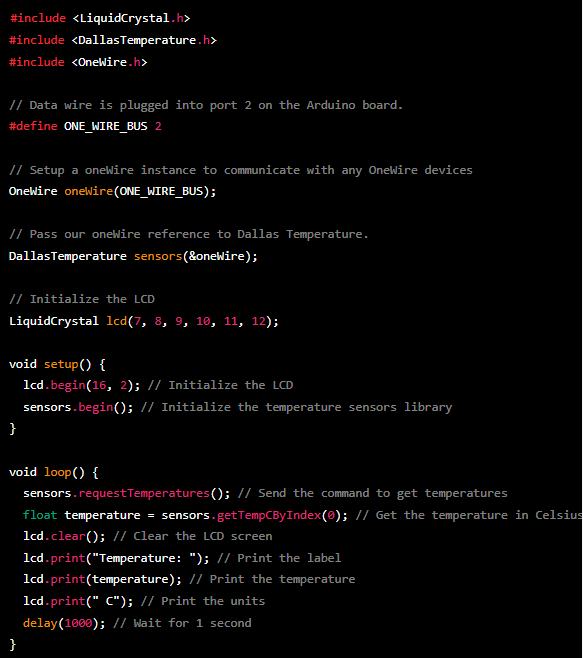
Digital Thermometer
Here is a basic code for a digital thermometer using an Arduino board and an LCD screen:
Traffic light controller: Build a Traffic Light Controller That Can Be Used To Control The Flow of Traffic at An Intersection
Here is a basic code for a traffic light controller using an Arduino board:

Design a System That Can Automatically Water Plants based On Soil Moisture Levels
Here is a basic code for an automatic plant watering system using an Arduino board:
Python Code:
const int moistureSensor = A0; // Pin to which the moisture sensor is connected const int waterPump = 8; // Pin to which the water pump is connected void setup() { pinMode(moistureSensor, INPUT); pinMode(waterPump, OUTPUT); } void loop() { int moistureValue = analogRead(moistureSensor); // Read the value from the moisture sensor if (moistureValue < 400) { // If the soil is dry, turn on the water pump digitalWrite(waterPump, HIGH); delay(1000); // Water for 1 second digitalWrite(waterPump, LOW); } delay(1000); // Check the moisture level again after 1 second }
Hardware and electronic items required:
- Arduino board (e.g. Arduino Uno)
- Moisture sensor (e.g. Soil Hygrometer)
- Water pump (e.g. DC water pump)
- Power supply (e.g. 9V battery)
- Breadboard (optional, for prototyping)
- Jumper wires
Circuit diagram:
How to connect the hardware components:
- Connect the positive (+) and negative (-) terminals of the 9V battery to the power supply pins of the Arduino board and the water pump.
- Connect the positive (+) terminal of the moisture sensor to A0 on the Arduino board.
- Connect the negative (-) terminal of the moisture sensor to GND on the Arduino board.
- Connect the positive (+) terminal of the water pump to digital pin 8 on the Arduino board.
- Connect the negative (-) terminal of the water pump to GND on the Arduino board.
Note: The pin connections may vary depending on the type of moisture sensor and water pump you use. Make sure to consult the datasheets for the specific components you are using.
The code I provided is not a complete program. It's just a sample code to control a water pump based on the soil moisture level read from a moisture sensor using an Arduino board. To use this code, you will need to upload it to the Arduino board using the Arduino Integrated Development Environment (IDE). The code I provided assumes that you have the necessary hardware components connected to the Arduino board as described in the circuit diagram.
Relay Module , Arduino UNO, Python
A relay module is an electrically operated switch that is used to control high-power electrical devices, such as lights, motors, and appliances, using a low-power control signal. Relay modules typically have a number of pins that are used to connect the relay to the control circuitry, such as an Arduino microcontroller.
Implementing an OLED display with an Arduino UNO board using Python
OLED (Organic Light-Emitting Diode) display is a type of display technology that uses organic compounds to produce light. OLED displays have several advantages over traditional LCD displays, including a wider viewing angle, faster response time, and higher contrast ratio.
The OLED display typically has the following pins:
- VCC: Power supply pin, typically connected to +3.3V or +5V
- GND: Ground pin, connected to the ground of the power supply
- SCL: Serial Clock pin, used for communication with the microcontroller
- SDA: Serial Data pin, used for communication with the microcontroller
- RES: Reset pin, used to reset the OLED display
- DC: Data/Command pin, used to select whether the data transmitted is data or a command
To implement the OLED display with an Arduino UNO board, you will need the following hardware and components:
- OLED display (128x64 pixels)
- I2C OLED module
- Arduino UNO board
- Breadboard
- Jumper wires
Here's the basic circuit diagram for connecting the OLED display to the Arduino UNO board:
+---------------+ | | | OLED Display| | | +---------------+ | +-------|-------+ | | | I2C OLED | | Module | +--------------+ | +-------|-------+ | | | Arduino UNO | | | +--------------+
To display text or graphics on the OLED display using Python and the Arduino UNO board, you will need to install the following libraries:
- Adafruit_SSD1306
- Adafruit_GFX
- Adafruit_BusIO
The libraries can be installed using the pip package manager.
Here's a sample Python code that displays text on the OLED display:
import time import board import digitalio import busio import adafruit_ssd1306 # Create the I2C interface i2c = busio.I2C(board.SCL, board.SDA) # Create the OLED display object display = adafruit_ssd1306.SSD1306_I2C(128, 64, i2c) # Clear the display display.fill(0) display.show() # Set the cursor position display.text('Hello, World!', 0, 0) display.show() time.sleep(5) # Clear the display display.fill(0) display.show()
The code above creates an I2C interface between the Arduino UNO board and the OLED display using the SCL and SDA pins. The OLED display object is created using the
adafruit_ssd1306 library. The display is then filled with black and the text "Hello, World!" is displayed on the screen using the text function. The display is updated using the show function.Interfacing of LCD Module With Arduino UNO In Python
An LCD (Liquid Crystal Display) module is a type of display commonly used for displaying text, numbers, or characters in various electronics projects.
The PINS of an LCD module typically include:
- GND: Ground
- VCC: Power supply voltage
- RS (Register Select): Selects between command register and data register
- R/W (Read/Write): Selects the read or write mode
- E (Enable): Used to trigger data transfer
- D0-D7: Data bus lines used to transfer data
- A, K: Backlight power supply pins
Here is an example code for implementing an LCD module with an Arduino UNO using the Python programming language:
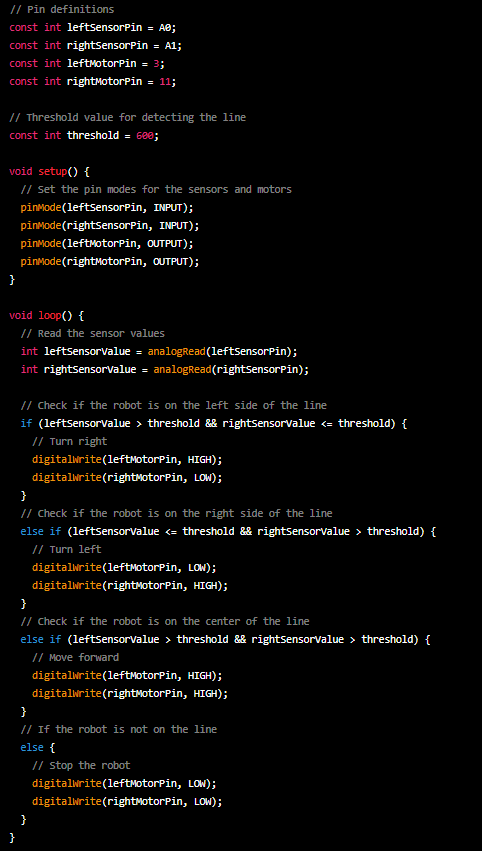
Line following robot: Create a robot that can follow a line on the floor using sensors and a motor controller - Python Language
Here's some sample Arduino code for creating a line following robot using sensors and a motor controller:
Controlling a DC Motor with a Switch using Arduino UNO
Here's some sample Arduino code for controlling a motor with a switch:

Weather station: Build a Weather Station that Can Measure Temperature, Humidity, and Other Meteorological Data - Python Language
Here is an example of a Python script and Arduino Board that can be used to collect data from a weather station that measures temperature, humidity, and pressure:

Automated Garage Gate Control Using Arduino UNO and HC-SR04 Ultrasonic sensor - Python Language
Here is an example code for detecting a car entering a garage using an Arduino UNO and an ultrasonic sensor:

Location Tracking System using Arduino UNO and Ublox NEO-6M GPS Module - Python Language
Here is an example of a code for GPS tracking using an Arduino UNO and a GPS module:

Real-Time Temperature and Humidity Monitoring using Arduino UNO and DHT11 Sensor - Python Language
Here is an example of a code for monitoring temperature and humidity using an Arduino UNO and a DHT11 sensor:

Scanning Barcode using GM66 QR module and Arduino UNO - Python Langauge
Here's an example of a program in Arduino that scans a barcode from a card using the GM66 QR module, compares the data to a database, and opens a gate using a servo if there is a match:

This code uses the Ethernet library to connect to a server and retrieve a database file, which is assumed to be in the root directory of the server and be named "database.txt". The database file should contain a list of card data, with each piece of data on a new line. The scanCard() function is where you would include the code to scan the card and get its data. If the card data is found in the database, the openGate() function is called to open the gate by moving the servo to a certain position.
Controlling a DC Motor with an Arduino UNO board and a Motor Driver Module - Python Language
Here is an example of a Python code for controlling a motor with an Arduino UNO board and a motor driver module:

This code uses the PySerial library to establish a serial connection with the Arduino on the COM3 port. The
motor_forward(), motor_backward() and motor_stop() functions are used to send the '1', '2' and '0' commands to the Arduino through the serial connection.
Subscribe to:
Posts (Atom)