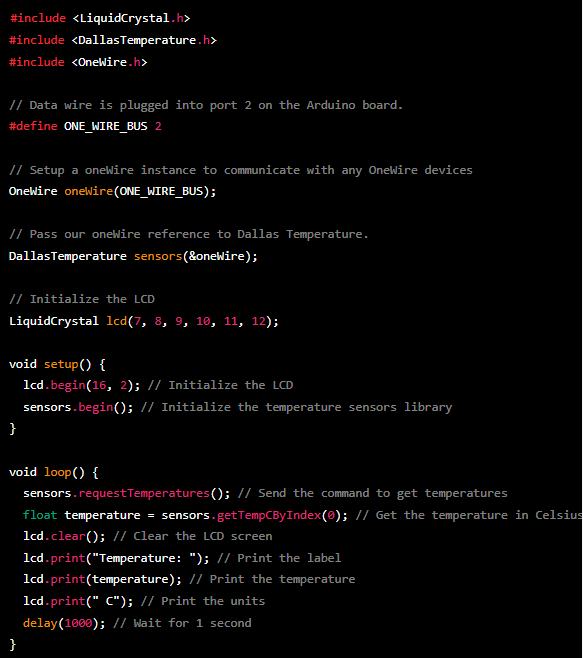
Here is a basic code for a digital thermometer using an Arduino board and an LCD screen:
Hardware and electronic items required:
- Arduino board (e.g. Arduino Uno)
- 16x2 LCD screen
- 10k potentiometer
- DallasTemperature library (for the temperature sensors)
- OneWire library (for communication with the temperature sensors)
- LiquidCrystal library (for communication with the LCD screen)
- DS18B20 temperature sensor
- Breadboard (optional, for prototyping)
- Jumper wires
Circuit diagram:
+-------+ | VCC | |-------| | RS | |-------| | RW | |-------| | EN | |-------| | D4 | |-------| | D5 | |-------| | D6 | |-------| | D7 | |-------| | A |---+ |-------| | | K |---+---+---+--- 10k potentiometer | | +-------+
How to connect the hardware components:
- Connect the VCC and GND of the LCD screen to 5V and GND on the Arduino board, respectively.
- Connect the RS, RW, EN, D4, D5, D6, and D7 of the LCD screen to the corresponding digital pins on the Arduino board (7, 8, 9, 10, 11, 12, and 13, respectively).
- Connect the middle pin of the potentiometer to the V0 (contrast) pin of the LCD screen.
- Connect the other two pins of the potentiometer to 5V and GND on the Arduino board, respectively.
- Connect the data pin of the temperature sensor to pin 2 on the Arduino board.
- Connect the VCC and GND of the temperature sensor to 5V and GND on the Arduino board, respectively.
No comments:
Post a Comment